Tuesday, June 8, 2021

How to get a backup SQL database history


How to get a backup SQL database history

This article will review how to get information on your backup SQL database history, including the metadata in MSDB that can be queried, as well as value-added tools and features to group, sort, report, and export this critical information

It is essential for each organization to define the backup policy in its environment. Such policies help to recover the database with minimum loss of the data and minimum downtime. SQL Server maintains a backup history in the system database msdb. We might be taking different kinds of backups to the main minimum restoration time. In the case of any disaster, we must know exactly how to get the data from this internal table and prepare the restoration plan accordingly. In this article, we will understand the way to retrieve the database backup history to meet these critical business requirements.

Below are tables in the msdb database for the database backups.

Backupfile

This table contains the row for each data or log file of the database for which we executed the backup SQL database. In the following image, we can see essential columns of this table:

SELECT [filegroup_name]
      ,[backed_up_page_count]
      ,[file_type]
      ,[file_size]
      ,[logical_name]
      ,[physical_name]
  ,State
      ,[state_desc]
      ,[backup_size]
  ,[differential_base_lsn]
 FROM [msdb].[dbo].[backupfile] 

Query results from backup SQL database backupfile MSDB table

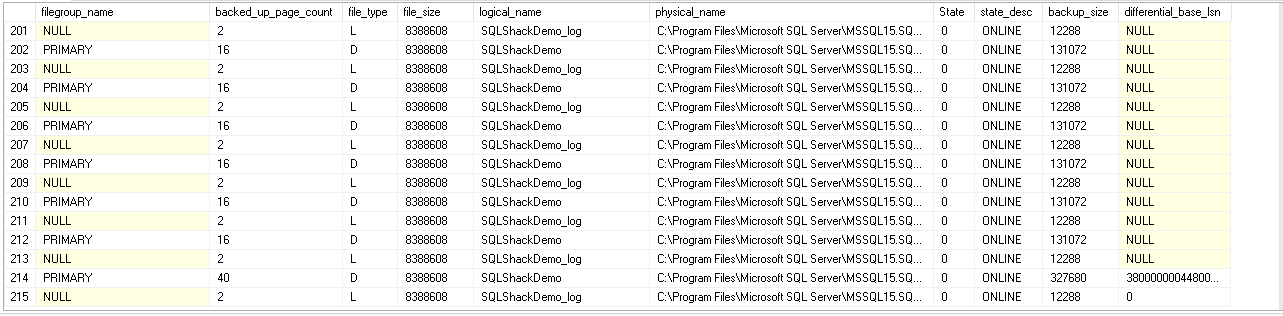
filegroup_name: It shows the filegroup name of the data or log file. We do not have any filegroup for the log file therefore; this column can contain NULL value.

backed_up_page_count: It shows the page count backed up.

file_type: We can get the file type using this field. It can have following values.

  • D: SQL Server data file
  • L: SQL Server log file
  • F: Full-text catalog
  • S: Memory optimised file

Logical_name: Logical name of the database file.

Physical_name: backup physical location.

State: It gives the state information of particular file. We can have following values for this.

  • 0 = ONLINE
  • 1 = RESTORING
  • 2 = RECOVERING
  • 3 = RECOVERY PENDING
  • 4 = SUSPECT
  • 6 = OFFLINE
  • 7 = DEFUNCT
  • 8 = DROPPED

backup_size: It gives the backup SQL database size in bytes.

differential_base_lsn: SQL Server takes a differential backup for the extents having LSN greater than differential_base_lsn.

backupmediafamily

In this table, we get the information about the logical and physical backup SQL database file name along with the device type in which backup was taken:

select logical_device_name ,physical_device_name,device_type from backupmediafamily

Query results from backup SQL database backupmediafamily MSDB table

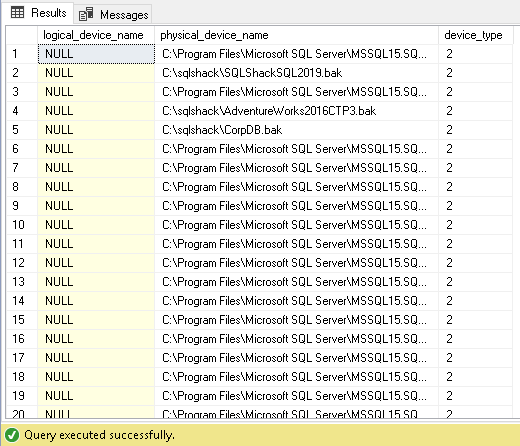
In the above screenshot, we can have the following device types:

  • 2 = Disk
  • 5 = Tape
  • 7 = Virtual device
  • 9 = Azure Storage
  • 105 = A permanent backup SQL database device

Backupset

In this table, we can get information about the successful backup for each database:

select name,user_name,first_lsn,last_lsn,database_backup_lsn,backup_start_date,backup_finish_date,
  type,database_name,server_name,machine_name from backupset

Query results from backup SQL database backupset MSDB table

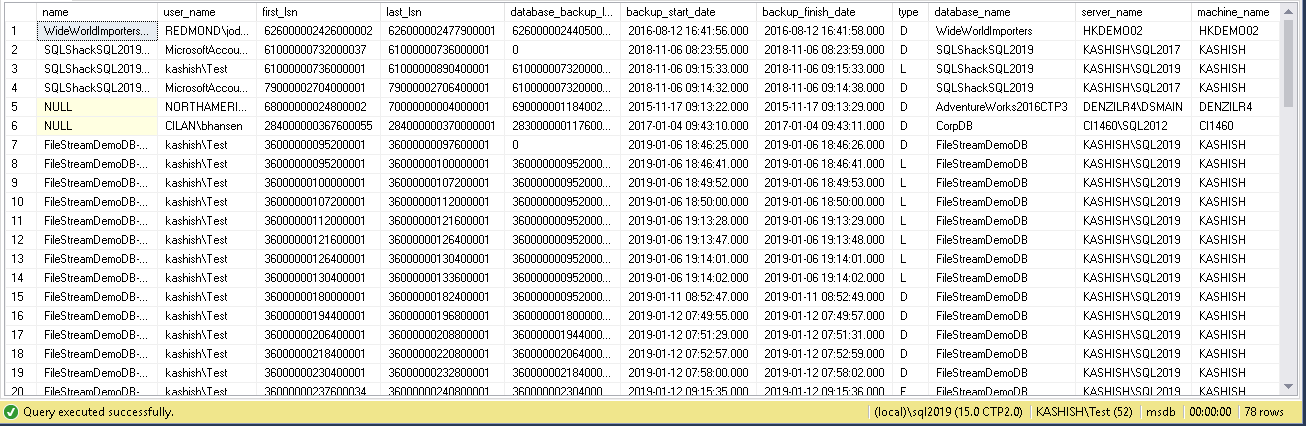
  • Name: backup SQL database set description
  • User_name: We can get a user who executed this backup from this column
  • Fist_lsn,last_lsn and database_backup_lsn: We get the backup LSN information from this column. It can help us to identify the backups after a particular LSN or preparing a restoration plan for a database
  • Backup_start_date and backup_finish_date: It gives the backup start and ends time
  • Server_name: It shows the instance name of the server
  • Machine_name: we can get the name of the machine from which we took the backup
  • Type: We can get the backup type using this column value. Here we have the following values

    D: Full database backup.

    L: log backup

    I: Differential database backup

We need to join these multiple tables to get the relevant backup information. For example, we can get the backup history from yesterday using the below query:

SELECT 
CONVERT(CHAR(100), SERVERPROPERTY('Servername')) AS Server, 
msdb.dbo.backupset.database_name, 
msdb.dbo.backupset.backup_start_date, 
msdb.dbo.backupset.backup_finish_date, 
CASE msdb..backupset.type 
WHEN 'D' THEN 'Database' 
WHEN 'L' THEN 'Log' 
When 'I' THEN 'Differential database'
END AS backup_type, 
msdb.dbo.backupset.backup_size, 
msdb.dbo.backupmediafamily.physical_device_name, 
msdb.dbo.backupset.name AS backupset_name
FROM msdb.dbo.backupmediafamily 
INNER JOIN msdb.dbo.backupset ON msdb.dbo.backupmediafamily.media_set_id = msdb.dbo.backupset.media_set_id 
WHERE (CONVERT(datetime, msdb.dbo.backupset.backup_start_date, 102) >= GETDATE()-1 ) 
ORDER BY 
msdb.dbo.backupset.backup_finish_date desc

Query results from and aggregation of MSDB tables with backup SQL database METADATA

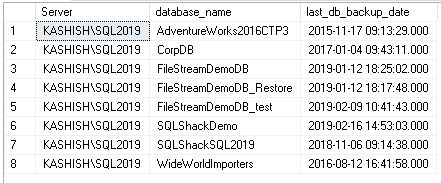
We might want to get a list of the most recent full backup of all the databases:

SELECT  
   CONVERT(CHAR(100), SERVERPROPERTY('Servername')) AS Server, 
   msdb.dbo.backupset.database_name,  
   MAX(msdb.dbo.backupset.backup_finish_date) AS last_db_backup_date 
FROM   msdb.dbo.backupmediafamily  
   INNER JOIN msdb.dbo.backupset ON msdb.dbo.backupmediafamily.media_set_id = msdb.dbo.backupset.media_set_id  
WHERE  msdb..backupset.type = 'D' 
GROUP BY 
   msdb.dbo.backupset.database_name

Query results from backup SQL database MSDB tables to get most recent full backups

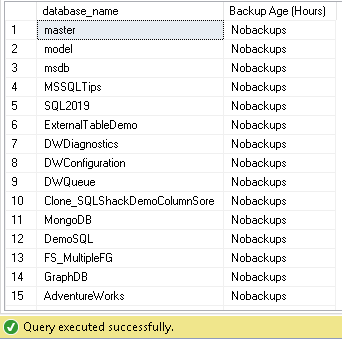
It is also equally important to identify if there are any databases for which we are not taking any backups. We can run the below query to get a list of such databases:

SELECT      
      S.NAME AS database_name,  
      'Nobackups' AS [Backup Age (Hours)]  
FROM 
   master.dbo.sysdatabases S LEFT JOIN msdb.dbo.backupset B
       ON S.name  = B.database_name 
WHERE B.database_name IS NULL AND S.name <> 'tempdb'
ORDER BY  
   B.database_name

In my test instance, you can see many databases having no database backups:

Query results from backup SQL database showing databases with no backups

It does become difficult to get the backup information each time based on the requirement. We need to write the code and get the data accordingly. We might be having different kinds of environments having different database needs, and if we have a large database environment, it becomes difficult to get this data. We might report backup failures or backup reports to the management. In such a case, we need a central place from which we can get any backup information for any database in the instance.

In SQL Server, you can do it using the central management server with the combination of SSIS, SSRS tools however it requires a good level of knowledge of the development of the information using these code but again if requirement changes, we need to make changes at all places to reflect the change.

Source:

https://solutioncenter.apexsql.com/how-to-get-a-backup-sql-database-history/


Sunday, May 31, 2020

Active Directory User Password Age command: Using Net User command to Display User Expiration Date

Using Net User command to Display User Expiration Date

This first method uses the net user command that is built into windows. This command is used to add, remove and make changes to user and computer accounts.
To determine when the password will expire for a single account open the command prompt and type the following command:
Net user USERNAME /domain
In the below screenshot is an example for the user mfoster.
In addition to displaying the password expires date it also provides other useful information such as password last set, when the password can be changed, if the account is active and so on.

Wednesday, May 13, 2020

(Solved) error: Something went wrong and your search couldn't be completed it looks like theres a problem with your network connection Outlook 2016 - Exchange 2016

This will stop the error, but Outlook will no longer perform any online searches:
HKEY_CURRENT_USER\software\microsoft\office\16.0\outlook\search
DWORD DisableServerAssistedSearch 1

Wednesday, January 22, 2020

Disable WSUS on Windows 10 by Registry Modification

Disable WSUS on Windows 10 by Registry Modification

This method is simple and easy. As an end-user, you can perform on your computer.
Note: This is just a temporary solution. If you connect back the computer to the company network, the WSUS group policy will be applied automatically and revert the changes we are going to do below.  The ideal permanent solution is to move your computer to the different OU where WSUS policy not applied, which can be done by the network/Windows update administrator only. So, as a computer user, we have only below option to disable WSUS on Windows 10.
To make Windows update/component to download from Microsoft online Windows update servers via the direct Internet, we can do these steps.
1) Open Registry editor (Type regedit in Search), and access following location.
Open Regedit
HKLM/Software/Policies/Microsoft/Windows/WindowsUpdate/AU/
2) Change the value from 1 to 0 in UseWUServer key. 1 is to use WSUS server and 0 for not.
Modified Registry - Disable WSUS On Windows 10
3) Once you have changed the above key from 1 to 0, close the registry editor and restart Windows update service. Even if you are okay, restart the computer to take effect.
Restart Windows Update Service
Now connect the computer to direct Internet and try Windows update or any other component installation from the Microsoft Update website. It should work fine this time.
You may need to check some more guides here about Windows update issues.

How to enable Remote Administration feature in Windows

To enable the Remote Administration feature manually, follow the steps given below:
  1. Click start>Run
  2. Enter gpedit.msc
  3. Click OK
  4. Double-click Computer Configuration>Administrative Templates>Network>Network Connections>Windows Firewall
  5. Double-click Domain Profile>Windows Firewall: Allow remote administration exception
  6. Select Enabled
  7. Click Apply
  8. Click OK

Thursday, August 8, 2019

How to let websites and IPs bypass the VPN using static routing


There are several reasons for letting certain IPs or websites bypass the VPN connection, so they are used with your real IP and connection instead.

For example:
  • if a certain website is blocking access to foreign IPs, so you can only access it with your real IP
  • if websites and services forbid the use of VPN, so your account won't get restricted or suspended
  • if you cannot access a local machine in your network while the VPN is connected (e.g. server, other computer or network device of any kind)

Manual setup via route.exe

On windows, to create static routing rules to let IPs bypass the VPN, you need to use the integrated tool "route.exe" of Windows.
You can find it in the folder C:\Windows\System32 - but it's executable from any place.
To use it, open a command prompt. Run "cmd.exe" or navigate to "All Programs/Accessories/Command Prompt" in the start menu.
Run "route" to get the instructions for how to use this tool. How to use it for our purpose (IPs bypassing the VPN) is quickly explained:
  • First you need to find your gateway IP address. This is usually the IP of your router/DSL-Modem, so the device your computer gets the internet from.
    If you're not sure which IP that is, please run "route print". 
  • You'll see that certain IPs are using a gateway address that belongs into your local network. In this case, 192.168.88.2 is our gateway IP address, the IP of the router
  • Keep that gateway IP address in mind. Now we need to get the IP of the website you want to bypass the VPN. For testing, we can use http://ipaddress.com
  • As you might know, this website shows your current IP and location. When disconnected from the VPN, go there and you'll see your real IP and location.
  • To get the IP of that website, you can simply ping it by running "ping ipadress.com". It returns the IP address, which is: 80.237.246.185
    Alternatively use websites like http://www.hcidata.info/host2ip.htm for this purpose
  • Now we create a routing rule for this website, by running "route add 80.237.246.185 192.168.88.2" (syntax: route add destinationIP gatewayIP)
  • When that is done, connect to the VPN and visit http://ipaddress.com again. You'll notice that it still shows your real IP and location, instead the VPN IP and location.
    That means the routing rule is working and the website is bypassing the VPN.

Note: This rules are only temporary, that means they disappear upon next reboot.
To make them permanent, use the switch "-p", so e.g. "route -p add 80.237.246.185 192.168.88.2"