How to patch ESXi with Update Manager
In a previous post, I wrote about how one can go about patching ESXi from the command line using the esxcli software vib command. This is all well and good when you only have a couple of hosts at hand. What would you do instead when faced with a significant number of hosts you need to update? The short answer is, use vSphere Update Manger (VUM). I’ve written about VUM in the past, so I’m skipping the how to install and configure it bits. If you’d like to learn more, have a look at these:
- All You Need to Know About vSphere Update Manager – Part 1
- All You Need to Know About vSphere Update Manager – Part 2
One of the features I like most about vCSA 6.5, is that VUM comes readily installed with the appliance, something that was on everybody’s wishlist since the appliance first shipped out. If you’re running vCenter Server for Windows, well, you’re stuck with installing VUM manually.
Today, I’ll be using vCenter Server Appliance 6.5 to update an ESXi 6.5 GA host to 6.5.0 d. The 4-part update process is as follows:
- Import an ESXi image to VUM
- Create a baseline
- Attach the baseline
- Remediate
vSphere Update Manager
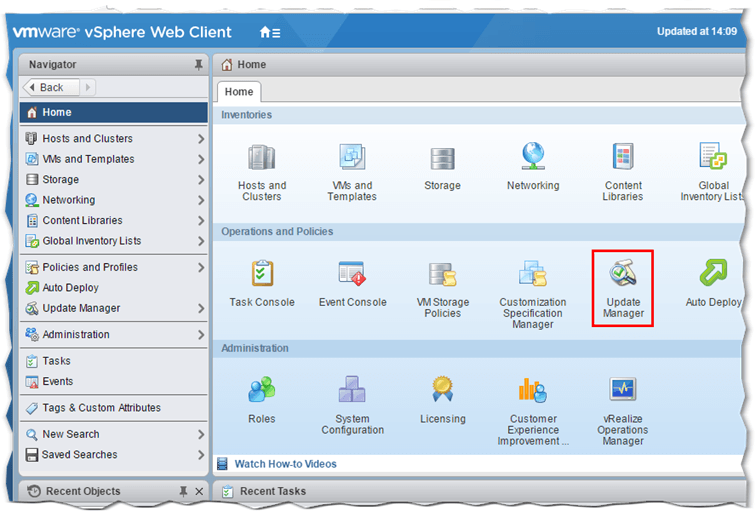
Update Manager comes as a vCenter plug-in which is accessible from a number of places within vSphere Web client. To load it, click on the Update Manger icon from the Home screen or simply select the vCenter Server hostname in Navigator and change over to the Update Manger tab. The interface consists of two main views, Admin and Compliance. The Admin view allows you to configure various aspect of VUM itself as well as manage baselines, the patch repository and ESXi images. The Compliance view, on the other hand, is where you carry out tasks such as attaching baselines, scanning for applicable updates and remediating.
How to import an ESXi image
So, the first thing we need to do to update ESXi via VUM, is to download the respective image from my.vmware.com and import it to Update Manager.
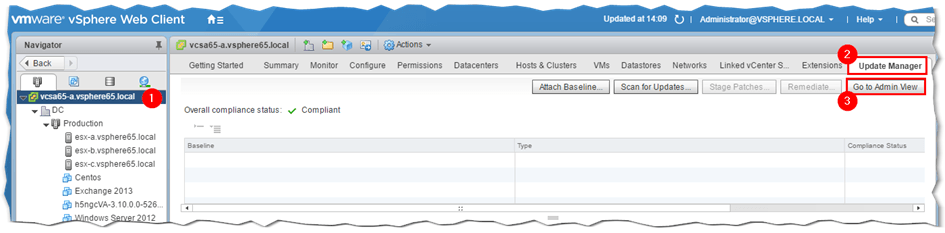
Step 1 – Highlight the vCenter Server name in Navigator, select the Update Manager tab and click on the Go To Admin View button.
–
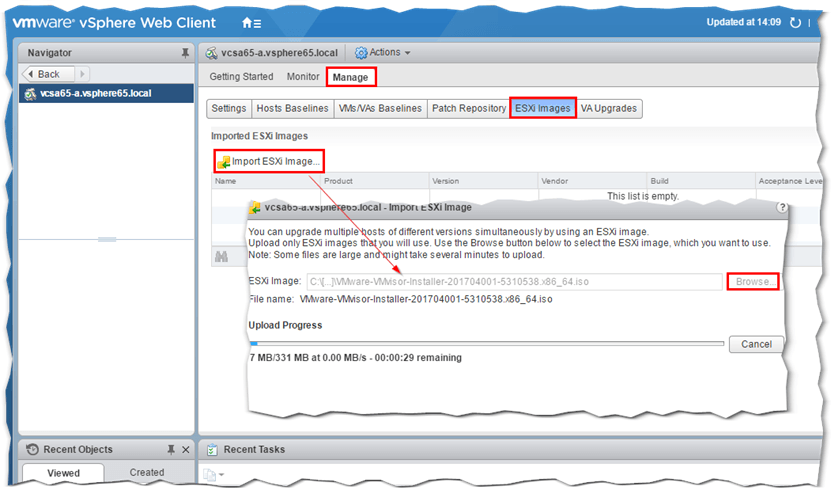
Step 2 – Once in Admin view, select the ESXi Images tab and click on Import ESXi Image. Doing so, loads another dialog box where you specify the ESXi image (ISO file) you want imported. Click on Browse and navigate to the folder where the image is stored. Select the ISO file and click OK. The file will upload as shown in Fig. 3. The upload progress bar, shows the remaining time and the speed at which the file is being uploaded.
–
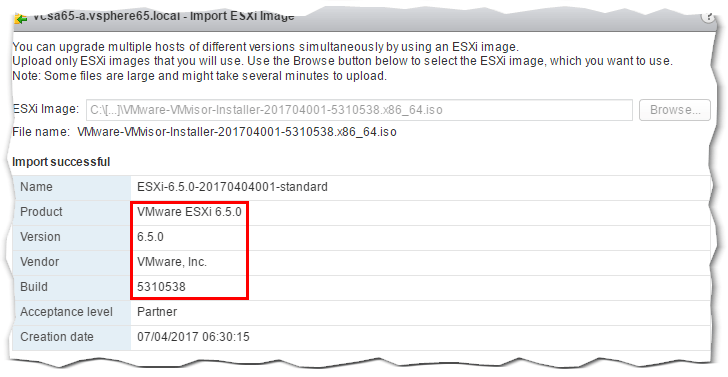
Step 3 – Once the ISO is uploaded, details about the ESXi image are displayed as per Figure 4.
–
Creating a baseline
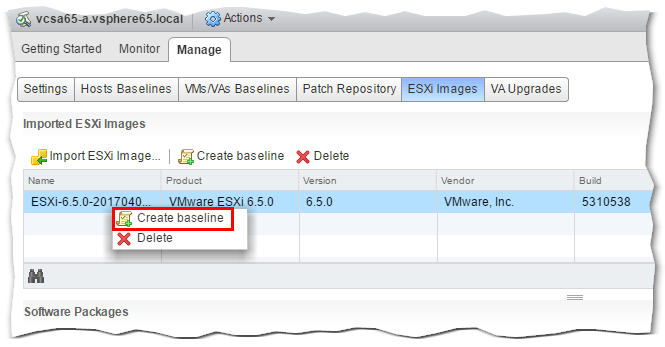
Step 4 – Next, we create what’s called a Host Baseline. To do this, we simply right-click on the image just imported and select Create baseline as shown in Figure 5.
–
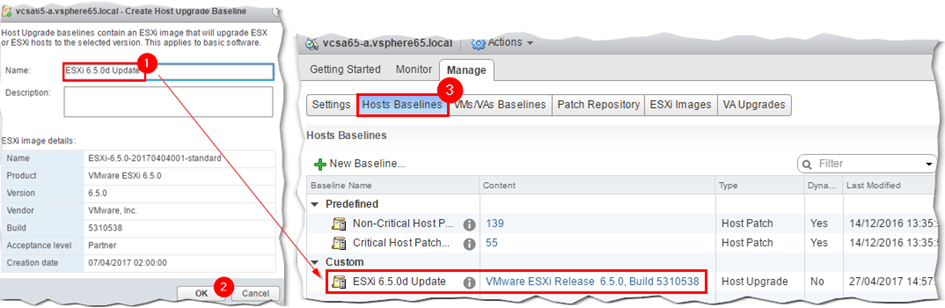
Step 5 – Type in a name for the baseline and press OK. The baseline should now be listed under the Hosts Baselines under Custom as per Fig. 6.
–
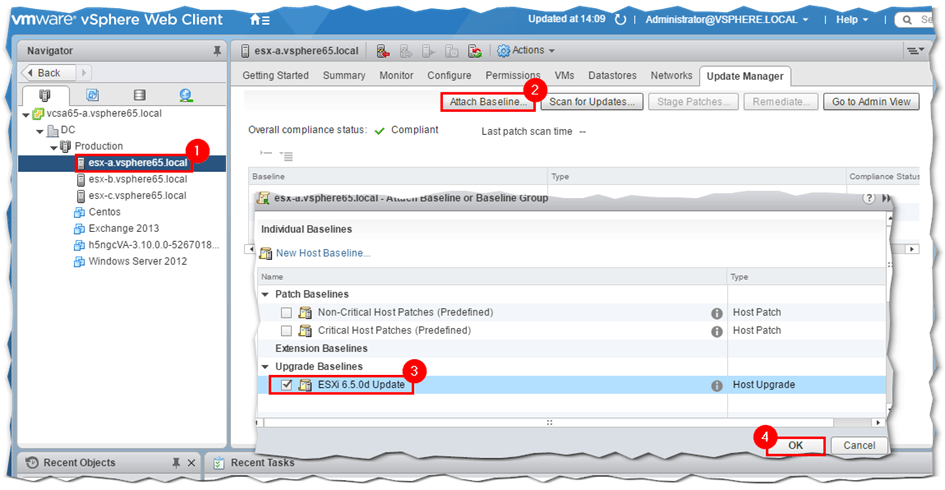
Attaching a baseline
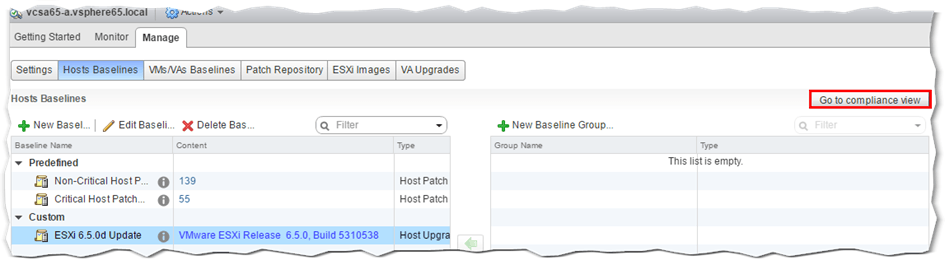
Step 6 – We’re almost there. The idea now is to attach the baseline to one or more hosts. We then run a compliance check to determine if the upgrade or update is actually required. To do this, one must change over to Compliance view. Just hit the Go to compliance view button at the top-right corner as shown in Fig. 7.
The baseline can in fact be attached to a number of objects including a datacenter, cluster or an individual ESXi host. This is what allows you to patch multiple hosts. It is important to note though that you may inadvertently hit hosts not earmarked for updates so be careful when attaching baseline to higher level objects.
In the example that follows, I’ve attached the baseline to one of three ESXi hosts forming a cluster.
–
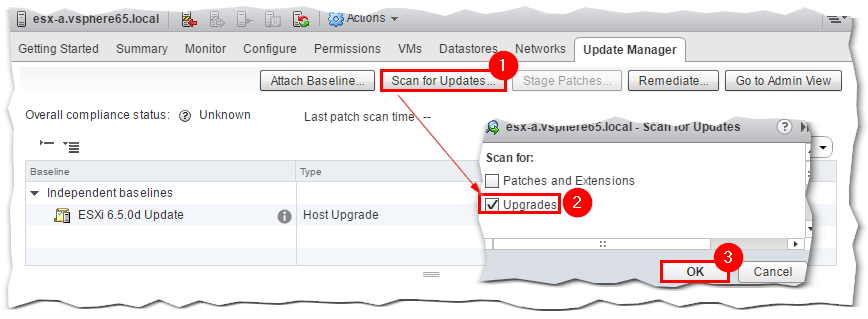
Step 7 – Next, we carry out a scan on the host to verify that the update/upgrade is in fact required. From the same screen, click on Scan for Updatesand select Upgrades on the dialog that pops up followed by OK. This will initiate a scan the results of which are displayed under the Compliance Status column after the scan completes.
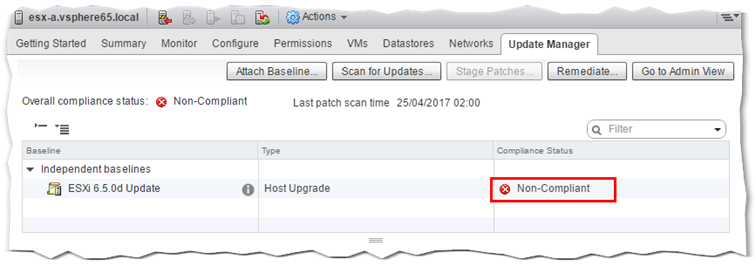
As expected, the host is found to be non-complaint, meaning that the 6.5.0d update is in fact applicable.
How to remediate the host
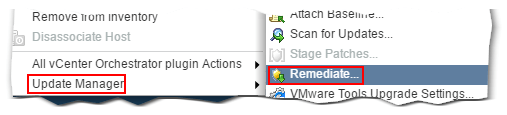
In this case, remediating is the act of pushing a patch or update to an ESXi host. A host is remediated by clicking on the Remediate button. Alternatively, right-click on the ESXi hostname (or IP address) in Navigator and select Remediate from the Update Manager menu.
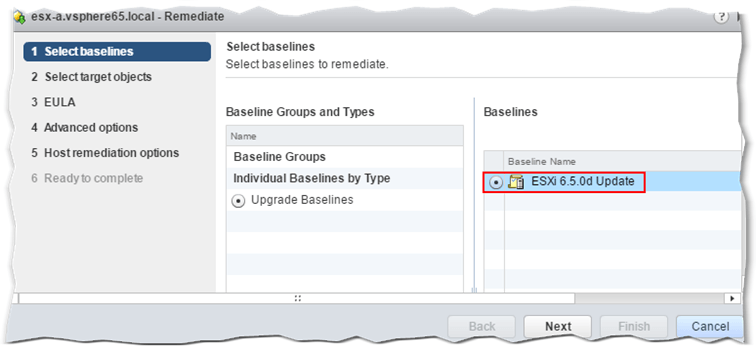
Step 1 – The remediation process starts by selecting the baseline image you want applied. In this case, I’ve selected the one created for the 6.5.0d upgrade.
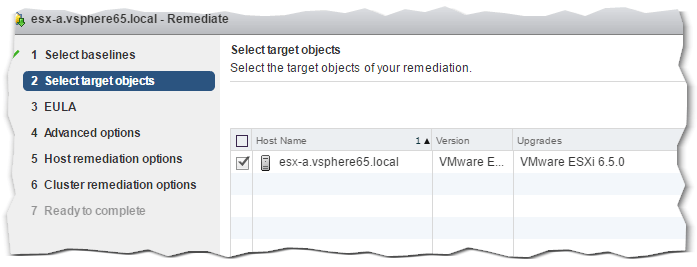
Step 2 – Next, select the host you wish to remediate. In this case, only one host is listed which is the one highlighted in Navigator. If say, the baseline had been attached to a cluster, then you’d have all the hosts within that cluster listed as target objects.
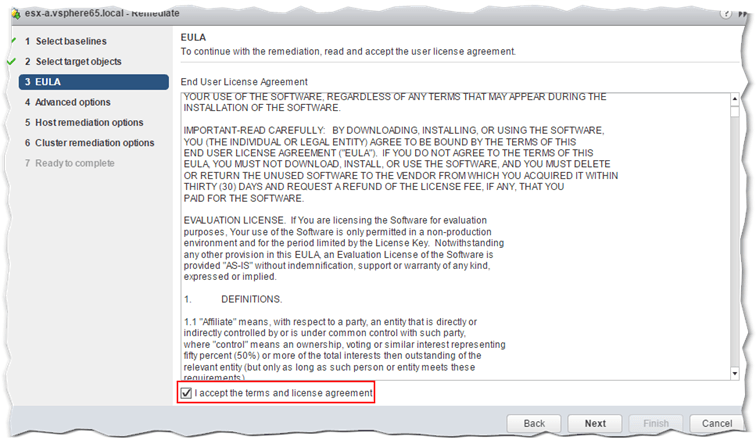
Step 3 – Accept the EULA by ticking the box at the bottom.
Step 4 – The next screen, gives you the option to postpone remediation tasks to a later date and time. You can also set the task to ignore warnings in reference to unsupported devices and such.

–
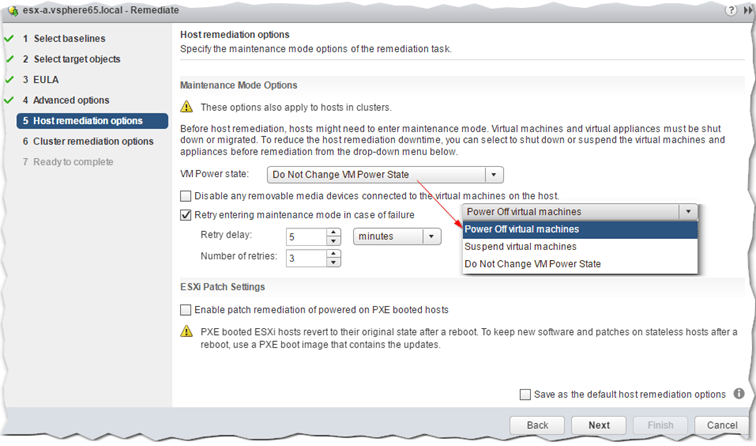
Step 5 – In all probability, the ESXi being remediated will be hosting VMs. This screen gives you control over what happens to the VMs currently powered on. You can choose to have them powered off, suspended or leave them in their current state. Like it or not, powered on VMs must be migrated or shut down for the remediation process to complete. Your options are to migrate VMs manually to some other host or simply power them off prior to remediating. Alternatively, set the VMs to power down by selecting the Power Off virtual machines option from the VM Power State drop-down box as shown in Fig. 16. You can also set the task to disconnect removable media from any hosted VMs as this may cause the remediation task to stall.
–
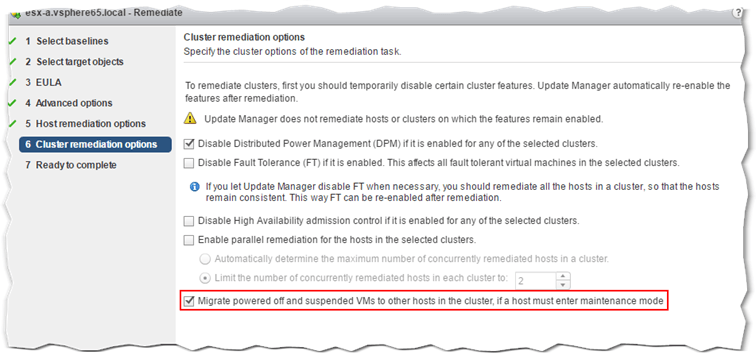
Step 6 – If the host being remediated is a cluster member, you can control various aspects related to clustering as shown in Fig. 17. Further details on each setting are available here.
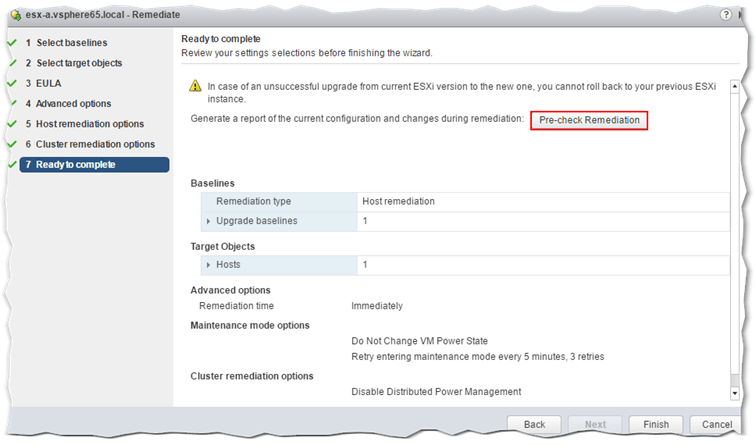
Step 7 – The Pre-check Remediation tasks runs a series of checks and generates a report of what exactly is carried out on the host. Press Finish to initiate the remediation task.
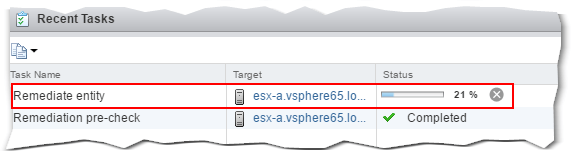
The remediation task’s progress is displayed in the Recent Tasks window in vSphere Web client.
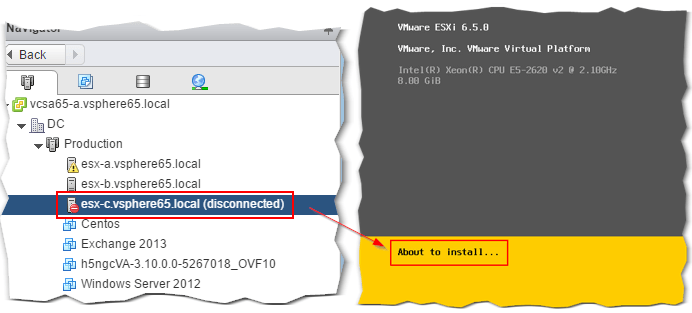
The host should enter maintenance mode and later disconnect while the update is being applied. It should then reboot and re-connect automatically, assuming the remediation processes succeeded in updating the host.
Once remediation completes, you can easily verify that the host is running the latest version by inspecting the host details on the Summary screen. Fig. 21 compares the host’s summary pre and post remediation.
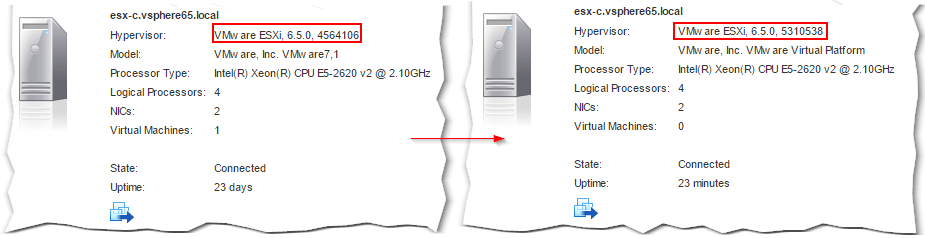
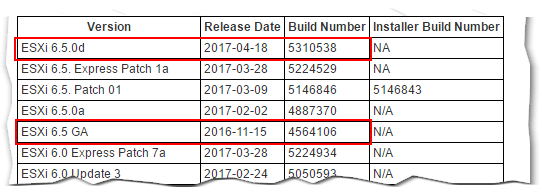
This VMware KB article helps you correlate build and version numbers if needed. As per the partial table below, you can see that in our case, the ESXi host updated from 6.5 GA to 6.5.0d.